Thursday, January 18, 2018

Mad Maximumz

A new year means a new project. In 3D we have begun to work on our new project which is mad maxing our own vehicles.

The first step was to start researching different vehicles and designs to incorporate into our models. While coming up with our vehicles and weapons there were a few things we had to think about:

  • What firing range would they need and how will they achieve that firing range?
  • What sort of armament will these future weapons use?
  •  What sort of self-propulsion system would the future hold and how would it be powered?
  • What self-defense systems will need to be available and what new weapons advancements must these vehicles overcome?


My vehicle is the Jaguar-X. It is a piloted RC with an AI co-pilot to reduce deaths. Since our vehicle had to be based 200 years in the future I considered how many times they would have tested a vehicle before having a working model. The Jaguar-X uses magnesium based alloy plates to protect itself from artillery.

Inside is my weapom; PP-827 or Party Pooper. The weapon is powered with a plasma core that super charges .50 caliber ceramic bullets. The plasma allows the bullet to pierce through any material and hit it's target. When the ceramic shatters it creates a spread giving the bullet maximum damage.


Tuesday, January 16, 2018

Insane in the Membrain

What happens when a highly advanced race tries to kidnap you for their studies? In my game the player is captured by a race of intellectual alien brains to be studied on their home world. The player must then escape and find the nearest escape pod and get home in time for dinner.
Final map
 While in the process of creating my map I asked myself a few questions about what my game would be about:


  • Where is the player?
  • How did the player get there?
  • What challenges must the player face?
  • Will the task be easy or difficult?
With those questions in mind I started to plan out my map. The original idea for my level was for my player to escape prison but, what's worse than being in prison? Being a lab rat for evil aliens. So, I thought about what elements would make them for advanced. Some examples would be moving platforms and the use of teleportation.
Rough map

Thursday, January 11, 2018

Map Analysis


The level layout for the opening level is fairly simple. It features a few enemies and obstacles for the player to overcome. Some important elements would be the use of hint boxes and egg boxes. The hint boxes gives the player information about how to perform different actions. On the other hand the egg boxes grow twice in size for a limited amount of time before shrinking back to normal size. The use of egg boxes allows the player to traverse over gaps and get out of deep holes.
Egg box

Yoshi's Island


Yoshi's Island is a 2D platform game that follows baby Mario and an island full of Yoshi's. The main goal of the game is to reconnect Mario to his baby brother Luigi. The opening level or tutorial level allows the player to learn the controls and progress through the story. The game features a few mechanics such as, jumping and using Yoshi's tongue to eat or spit out enemies.


The tutorial level starts the player off by welcoming them to "Yoshi's Island". The pacing of the tutorial level is pretty moderate which allows beginners to take their time and figure out the controls. At the start of the level the player is faced with their first obstacles; Shy Guys. Shy Guy's are one of the many enemies in Yoshi's Island. If the player is hit they have 10 seconds to retrieve baby Mario before he is kidnapped.
Countdown before baby Mario is kidnapped
Similar to other Mario games, the player is given little or no information about the game mechanics. However, the player learns the controls through gameplay, trial and error, and encounters. To help the player learn different moves like the extended jump, the player encounters hint boxes. The hint boxes informs the player on how to perform different moves and how to defeat enemies.
Above Yoshi is a hint box
Some notable mechanics that are in the game are Yoshi's jump, eating and spitting out enemies, and throwing eggs. These mechanics allow the player to traverse through the level and defend themselves against enemies that would bring harm to baby Mario. The use of the egg throw requires that the player eats an enemy. However, when the player performs the attack they are given a selected angle before launching the egg into enemies or to save baby Mario if he is ever knocked off Yoshi's back.
Using the egg toss


Tuesday, December 5, 2017

Pre-Production

Before creating our game we went through a pre-production stage. During this stage we thought about what kind of game we would be making and the process of putting the game together. After establishing what kind of game we would be making we began drawing out the pieces that we would use to put our game together. Also known as Mod kit. While drawing my mod kit pieces I thought about the details that would go into the piece. Such as, nails, splintered wood, and build materials. I also added notes on the side of my sketches to explain why I went with certain design choices.

(Mod Kit sketches)

In our game design class we created a storyboard to show how our game would play. Where is the player going? What happens if they go left instead of right? What obstacles must the player face?

(Storyboard pg. 1)


In the bottom left of the image I thought about how my room would be set. I wanted to create an altar room that would feel enclosed and tight spaced to make the player feel suffocated and anxious.

(Storyboard pg. 2)

Friday, December 1, 2017

Teaser Storyboard

 To get an idea for my trailer I first thought about the story behind it.

After figuring out my story I went into the different elements of film to think about how my trailer would be shot. I also thought about the idea of using voice overs for the beginning of the trailer.
Storyboard 
 This was my final rendition of my mock up storyboard. I took screenshots of my level and gameplay to get an idea of what clips I wanted to use.
Layout


Wednesday, November 29, 2017

The Night Prowler


The Night Prowler was my 3D model that I made during my freshmen year. I had a few difficulties trying to find an interesting position that would make my creature interesting and prevent the clay from cracking during the baking process.

(Concept art)
The original name for my creature was Sprygon. Around the final production of my model I changed the name to better suit the creature. One MAJOR mistake I made was not integrating the base into the final product which is very off putting.

Making a Door Rotate


Things are picking up and I don't want to slow down so here is a quick tutorial on how to make rotating doors.


  • The first step is drag in a trigger box and create a collision for On Actor Begin Overlap node.

  • The next step is to create a sequence. The sequence allows the player to add multiple nodes to activate at the same time.
  • Dragging out from 0, Right+click and go to Add Timeline
  • Dragging out from 1, Right+click and go to Play Sound 2D
(You can add a DoOnce if you want an action to happen once)
Inside Timeline
  • Double click your timeline and create a Float (f+)
Pro Tip: Don't forget to name your assets. Ex. Door_ANIM
(Key Frame 1)
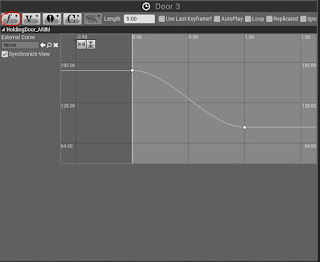
  • To create a Key Frame, shift+right click. In the first key frame put Time: 0.0 Value: 180.0

(Key Frame 2)
  • Create another key frame and adjust the time to desired value depending on the speed. Time: 1.0 Value: 90.0


 You're almost there!

  • The next step is to select your rotating object and drag from the timeline's Update. Right click and add a Set Actor Rotation node. Once you have created that node a reference node will be created automatically.
  • Dragging from the Door_ANIM (the float you created) right click and create a Make Rotator.
(Be sure to attach the ANIM to Z)

  • The final step is to drag the return value to New Rotation

Tuesday, November 28, 2017

Teaser Trailer


The following teaser I've decided to use is Outlast II. The reason I decided to use this teaser is because of the voice over being used. As the narrator is talking the viewer can see what appears to be a burning cross as the camera zooms out. As the narration continues and becomes more violent the camera pans upwards to show and upside down cross burning in a field.

Friday, November 10, 2017

Sound Effects

I am now at the stage of implementing sound effects into my game. I was able to find a few royalty free websites but some of them require you to be a paying customer or make an account before you download the audio. Fortunately there are a few websites that I can use with the use of my Ringling account.


Killer Trackshttps://www.killertracks.com/

Sound Libraryhttp://home.ringling.edu/index.php?id=3645&ext=

Wednesday, November 8, 2017

Making a tree Pt. 1

I started working on my second hardest prop which is a tree. The tree seemed to be difficult at first but after learning simple methods it was easy.
(Tree base)
To start my tree I created a cylinder inside of Maya and applied edge loops to bend the tree's shape. Afterwards I exported the base into an OBJ so that I could import it into ZBrush

(First tree attempt.)
Wasting three days of my time I imported my tree base. To get the branches I pulled parts of the clay out using the Move Topological tool.

(ZSphere tree base)
While in class I learned there was an easier way to create my tree; ZSphere. ZSphere allowed me to create the base of my tree and make the limbs more natural and fluid.


Tools I Used
(Move Topological)

(ZSphere)


Here's a helpful link to get started😃: https://www.youtube.com/watch?v=NIoIdt54wF8

Labels

Isometric sketches

A new year a new level design!! We are beginning to work on our gaming mechanics by creating isometric sketches of a weapon we might wa...